How to use a gentle leader dog harness?
Walking your dog should be enjoyable, but many owners struggle with pulling, lunging, or reactive behavior. Traditional collars and harnesses often fail to address these issues, leading to frustration for both you and your dog.
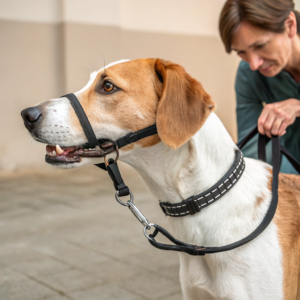
**A A Gentle Leader is a head halter1 that fits over your dog’s nose and behind their ears, giving you control of their head direction
I’ve recommended Gentle Leaders to hundreds of clients over the years, and the transformation can be remarkable when used correctly. However, this tool requires proper introduction and handling to be effective and comfortable for your dog.
What are common mistakes using a Gentle Leader?
Many dog owners purchase a Gentle Leader with high hopes, only to abandon it after their dog resists wearing it or the tool doesn’t deliver the expected results. These disappointments usually stem from common handling errors.
The most common Gentle Leader mistakes include improper fitting (too tight or loose), skipping the acclimation process, using leash corrections, letting the nose loop hang below the dog’s mouth, and relying on it as a substitute for training rather than a training aid.
Through my years of working with reactive and strong-pulling dogs, I’ve observed these mistakes repeatedly. Understanding these errors can help you avoid them and use this tool successfully.
Improper Fitting
The most frequent issue I see is incorrect fitting, which can make the Gentle Leader uncomfortable or ineffective:
-
Nose Loop Positioning Problems
The nose loop should rest at the base of the muzzle, just where the skin meets the fur, not down on the soft cartilage of the nose. When fitted too low:
- It can restrict normal panting
- May rub against sensitive nose tissue
- Can slide off entirely if loose enough
Conversely, when positioned too high near the eyes:
- It can irritate the delicate eye area
- May not provide proper control
- Can be easier for dogs to paw off
-
Neck Strap Issues
The neck strap must be very snug behind the ears, with room for only one finger between the strap and your dog’s skin. Common errors include:
- Too loose: Allows the entire halter to rotate or slide off
- Too low: Sitting on the muscular part of the neck reduces control
- Too tight: Causes discomfort and potential resistance
I often use this analogy with clients: "Think of it like a properly fitted belt—snug enough to stay in place, but not so tight that it causes discomfort."
Skipping the Acclimation Process
Another critical mistake is rushing the introduction process:
| Common Rush Mistake | Consequence | Better Approach |
|---|---|---|
| Putting it on immediately for a walk | Creates negative association | Gradual introduction with treats |
| Forcing it on a resistant dog | Builds fear of the equipment | Short, positive sessions over days/weeks |
| No rewards during introduction | Misses opportunity for positive association | High-value treats during fitting and wearing |
I’ve seen owners give up after one or two tries because their dog pawed at the halter or refused to walk. This is completely normal behavior when first introducing any new equipment—especially something that touches the sensitive face area.
Leash Handling Errors
Even with perfect fitting, improper leash handling can negate the benefits of a Gentle Leader:
- Using Using jerking motions**: The Gentle Leader1 requires gentle, steady pressure, not corrections
In my experience, these handling errors often stem from habits developed with traditional collars or harnesses. The Gentle Leader requires a completely different approach—think guidance rather than correction.
Misunderstandings About Purpose
Many owners mistakenly view the Gentle Leader as:
- A muzzle (it’s not—dogs can still open their mouths to pant, drink, and even bite)
- A permanent solution (rather than a training tool)
- A magical quick fix (without complementary training)
I always emphasize to clients that the Gentle Leader is a training aid, not a substitute for teachingI always emphasize to clients that the Gentle Leader1 is a training aid, not a substitute for teaching loose-leash walking skills
How to use a Gentle Leader correctly?
Using a Gentle Leader effectively involves much more than simply putting it on your dog. Proper introduction, fitting, and handling are essential for both success and your dog’s comfort.
To use a Gentle Leader correctly, gradually acclimate your dog using To use a Gentle Leader1 correctly, gradually acclimate your dog using positive association, ensure proper fit with the neck strap high and snug behind the ears, position the nose loop at the base of the muzzle, use gentle leash pressure instead of corrections, and reward good behavior consistently.
My step-by-step approach with clients has helped even the most resistant dogs accept this tool. Let me share the complete process I recommend for successful Gentle Leader introduction and use.
The Proper Introduction Process
Rushing the introduction is the quickest way to failure with a Gentle Leader. Here’s my proven acclimation protocol:
Phase 1: Building Positive Association (3-7 days)
- Show the Gentle Leader and give high-value treats (cheese, chicken, etc.)
- Touch the Gentle Leader to your dog’s chin/neck, followed by treats
- Hold the nose loop near your dog’s nose without putting it on, followed by treats
- Practice for several short (1-3 minute) sessions daily
Phase 2: Brief Wearing Sessions (4-10 days)
- Put the nose loop on for 2-3 seconds, then immediately remove it and reward
- Gradually increase wearing time from seconds to minutes
- Put it on before exciting activities (meals, walks, play)
- Never force it if your dog shows strong resistance—back up a step
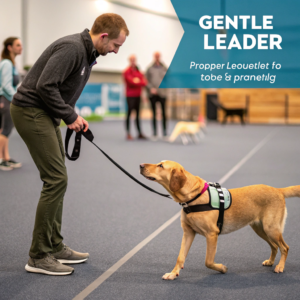
Phase 3: Walking With the Gentle Leader
- First, just stand with it on and reward calm behavior
- Take a few steps in your home, rewarding loose leash
- Graduate to short walks in low-distraction environments
- Slowly increase walk duration and distraction levels
I’ve found this gradual approach successfully converts even the most reluctant dogs. The key is patience—rushing any step often means starting over.
Achieving the Perfect Fit
A correctly fitted Gentle Leader is crucial for comfort and effectiveness:
-
Neck Strap Placement
- Position high on the neck, just behind the ears
- Tighten until you can fit only one finger between strap and neck
- The connecting ring should be under the jaw
-
Nose Loop Adjustment
- Should rest at the base of the muzzle where fur meets skin
- Loose enough for your dog to open their mouth fully to pant
- Snug enough that it can’t slip off the nose
- When fitted correctly, the loop should not hang below the mouth
-
Checking Overall Fit
- Your dog should be able to pant, drink, and take treats
- The halter should not rotate around the muzzle
- No rubbing or chafing should occur at any point
I recommend rechecking the fit after every few uses, as the straps may loosen over time.
Proper Leash Handling Techniques
How you handle the leash is just as important as how the Gentle Leader fits:
-
Light Touch Principle
- Use the minimal pressure needed to communicate
- Allow slack in the leash whenever possible
- Think guidance, not control
-
Pressure and Release
- Apply gentle pressure to communicate direction
- Immediately release when your dog responds correctly
- This release is critical—it’s the reward that teaches
-
Hand Position
- Keep your hand low (around waist level)
- Avoid pulling upward, which puts pressure on sensitive nose areas
- Use small, gentle steering motions rather than jerks or pulls
When done correctly, it should look effortless—small, gentle guidance rather than obvious corrections.
Progressive Training Goals
I always stress to my clients that the Gentle Leader works best as part of a comprehensive training plan:
- Initial stage: The tool provides immediate physical control
- Middle stage: Pair with training commands and rewards
- Final stage: Gradually transition to a regular collar or harness
Document your progress—many of my clients keep a simple log of reactive episodes or pulling incidents and find they decrease significantly with consistent use and training.
Do vets recommend Gentle Leader?
The veterinary community holds diverse opinions about head halters like the Gentle Leader. Understanding these perspectives can help you make an informed decision about whether this tool is right for your dog.
**Many veterinarians do recommend Gentle Leaders, particularly for strong pullers orMany veterinarians do recommend Gentle Leaders1, particularly for strong pullers or reactive dogs, as they reduce neck strain and provide control without pain.

I’ve consulted with numerous veterinarians about head halters over the years, and their insights have shaped my approach to recommending and using these tools.
Veterinary Benefits of Gentle Leaders
Many veterinarians support Gentle Leaders for specific situations:
-
Medical Advantages
- Reduces strain on neck structures compared to collar pressure
- Lowers risk of tracheal damage in brachycephalic breeds (pugs, bulldogs)
- Provides control without pressure on the spine or throat
-
Behavioral Applications
- Veterinary behaviorists often recommend them for reactive dogs
- Can be part of a treatment plan for dogs with certain behavior issues
- Provides immediate management while behavior modification takes effect
-
Safety Benefits
- Gives owners control of strong dogs without resorting to aversive tools
- Reduces pulling that might lead to owner falls or injuries
- Prevents dogs from eating harmful items on walks by controlling head movement
Dr. Sophia Yin, a renowned veterinary behaviorist, was a proponent of head halters when properly introduced and fitted, noting their effectiveness in providing control without force.
Veterinary Concerns and Cautions
Some veterinarians express reservations about head halters:
-
Physical Considerations
- Potential for neck injury if a dog lunges suddenly
- Possible skin irritation with improper fit or extended wear
- Concerns about long-term impact on neck muscles with improper use
-
Behavioral Considerations
- Risk of increasing frustration if not properly introduced
- Possible over-reliance as a management tool rather than training
- Potential for learned helplessness in sensitive dogs
-
Breed-Specific Concerns
- Not recommended for some brachycephalic breeds with breathing difficulties
- Extra care needed for dogs with eye issues (e.g., bulging eyes)
- Caution advised for dogs with certain dental or nasal problems
Dr. Karen Overall, veterinary behaviorist and researcher, notes that while head halters1 can be valuable tools, they must be introduced carefully to avoid creating negative associations.
Veterinary Consensus on Best Practices
Most veterinary professionals agree on these fundamental principles:
| Aspect | Veterinary Recommendation |
|---|---|
| Introduction | Gradual, positive association-based approach |
| Fit | Proper sizing and adjustment is critical |
| Duration | Not intended for all-day wear |
| Training | Should be paired with positive reinforcement training |
| Supervision | Always supervised, never for tie-out or correction |
I’ve found that veterinarians who express concerns about Gentle Leaders are often reacting to improper use they’ve witnessed, rather than the tool itself when used correctly.
Special Veterinary Considerations
Veterinarians often recommend additional precautions for certain dogs:
-
Medical Screening
- Dogs with history of neck injuries may need alternative solutions
- Dogs with facial nerve sensitivity might not tolerate head halters
- Seizure-prone dogs might do better with body harnesses
-
Regular Reassessment
- Periodic veterinary check of fit and any wear areas
- Evaluation of behavioral response to the tool
- Discussion of progress toward training goals
From my discussions with veterinary professionals, the consensus seems to be that Gentle Leaders can be valuable tools when properly fitted, introduced, and used as part of a comprehensive training program—but they’re not appropriate for every dog.
Conclusion
The Gentle Leader can be an effective tool for managing pulling and reactivity when used correctly. Avoid common mistakes like improper fitting and rushed introduction, follow the step-by-step acclimation process, and consult with veterinary professionals about whether it’s appropriate for your specific dog’s needs and health situation.